Choc Baileys Tarts

DSC_0305

I do apologise for the long delay between posts, I have been doing a bit of experimenting in the kitchen of late, as well as working hard at my new job!

My wonderful friends and I had a pool party yesterday and, as designated dessert maker, I adapted a recipe I’ve made a couple of times before.

I love chocolate tarts and they are a pretty regular fixture on my special occasion dessert list. I originally made this recipe as a large tart but have found it easier to serve and that the filling sets more quickly in individual tart form. The fact that they look super cute is just a bonus! The recipe is easily adapted to be gluten free by simply exchanging the flours for gluten free alternatives.

The tart case is a chewy, nutty adaptation of the base I use for my salted caramel slice, and goes beautifully with the rich chocolate-liquer filling. I topped each tart with a candied pecan, not the prettiest decoration, but they add a nice bit of extra crunch and nuttiness.These were a real hit and tasted great accompanied by some fresh berries and ice cream.

I always have music on at home,  especially when I’m baking. My soundtrack for recipe was Paul McCartney and Wings’ album Red Rose Speedway. I had to have a bit of fun with the sleeve, it fit too well.

red rose chocolate tart

As Paul says, ‘Get On The Right Thing’ – give these tarts a go!

You will need:

Hazelnut tart cases:

  • 125g unsalted butter, melted
  • 1 cup (100g) hazelnut meal
  • 1/4 cup self raising flour, sifted
  • 3/4 cup plain flour
  • pinch of sea salt
  • 1 cup firmly packed brown sugar

Choc-Baileys filling:

  • 200g good quality dark chocolate, chopped
  • 1 tsp vanilla essence
  • 300ml thickened cream
  • 2 tbsp Baileys Irish Cream Liquer

Candied pecans (if desired- plain pecans or hazelnuts will also work on top!):

  • 1/4 cup pecans
  • 1/4 cup caster sugar
  • 2 tbsp water
  • 1 tsp vanilla essence

Method

1. Preheat oven to 180ºC and line a 12 hole muffin tin with rectangular strips of baking paper, with one end sticking over the edge of the cup (this means the cups stay well-shaped- no paper folds sticking in, and are easy to remove).

2. Mix butter, hazelnut meal, flours, brown sugar and salt in a large mixing bowl until well combined.

3. Press balls of mixture into prepared tin, making the base reasonably thick and pressing up the sides, trying to keep the sides even and not too bulky- you need room for the filling after all!

DSC_0289

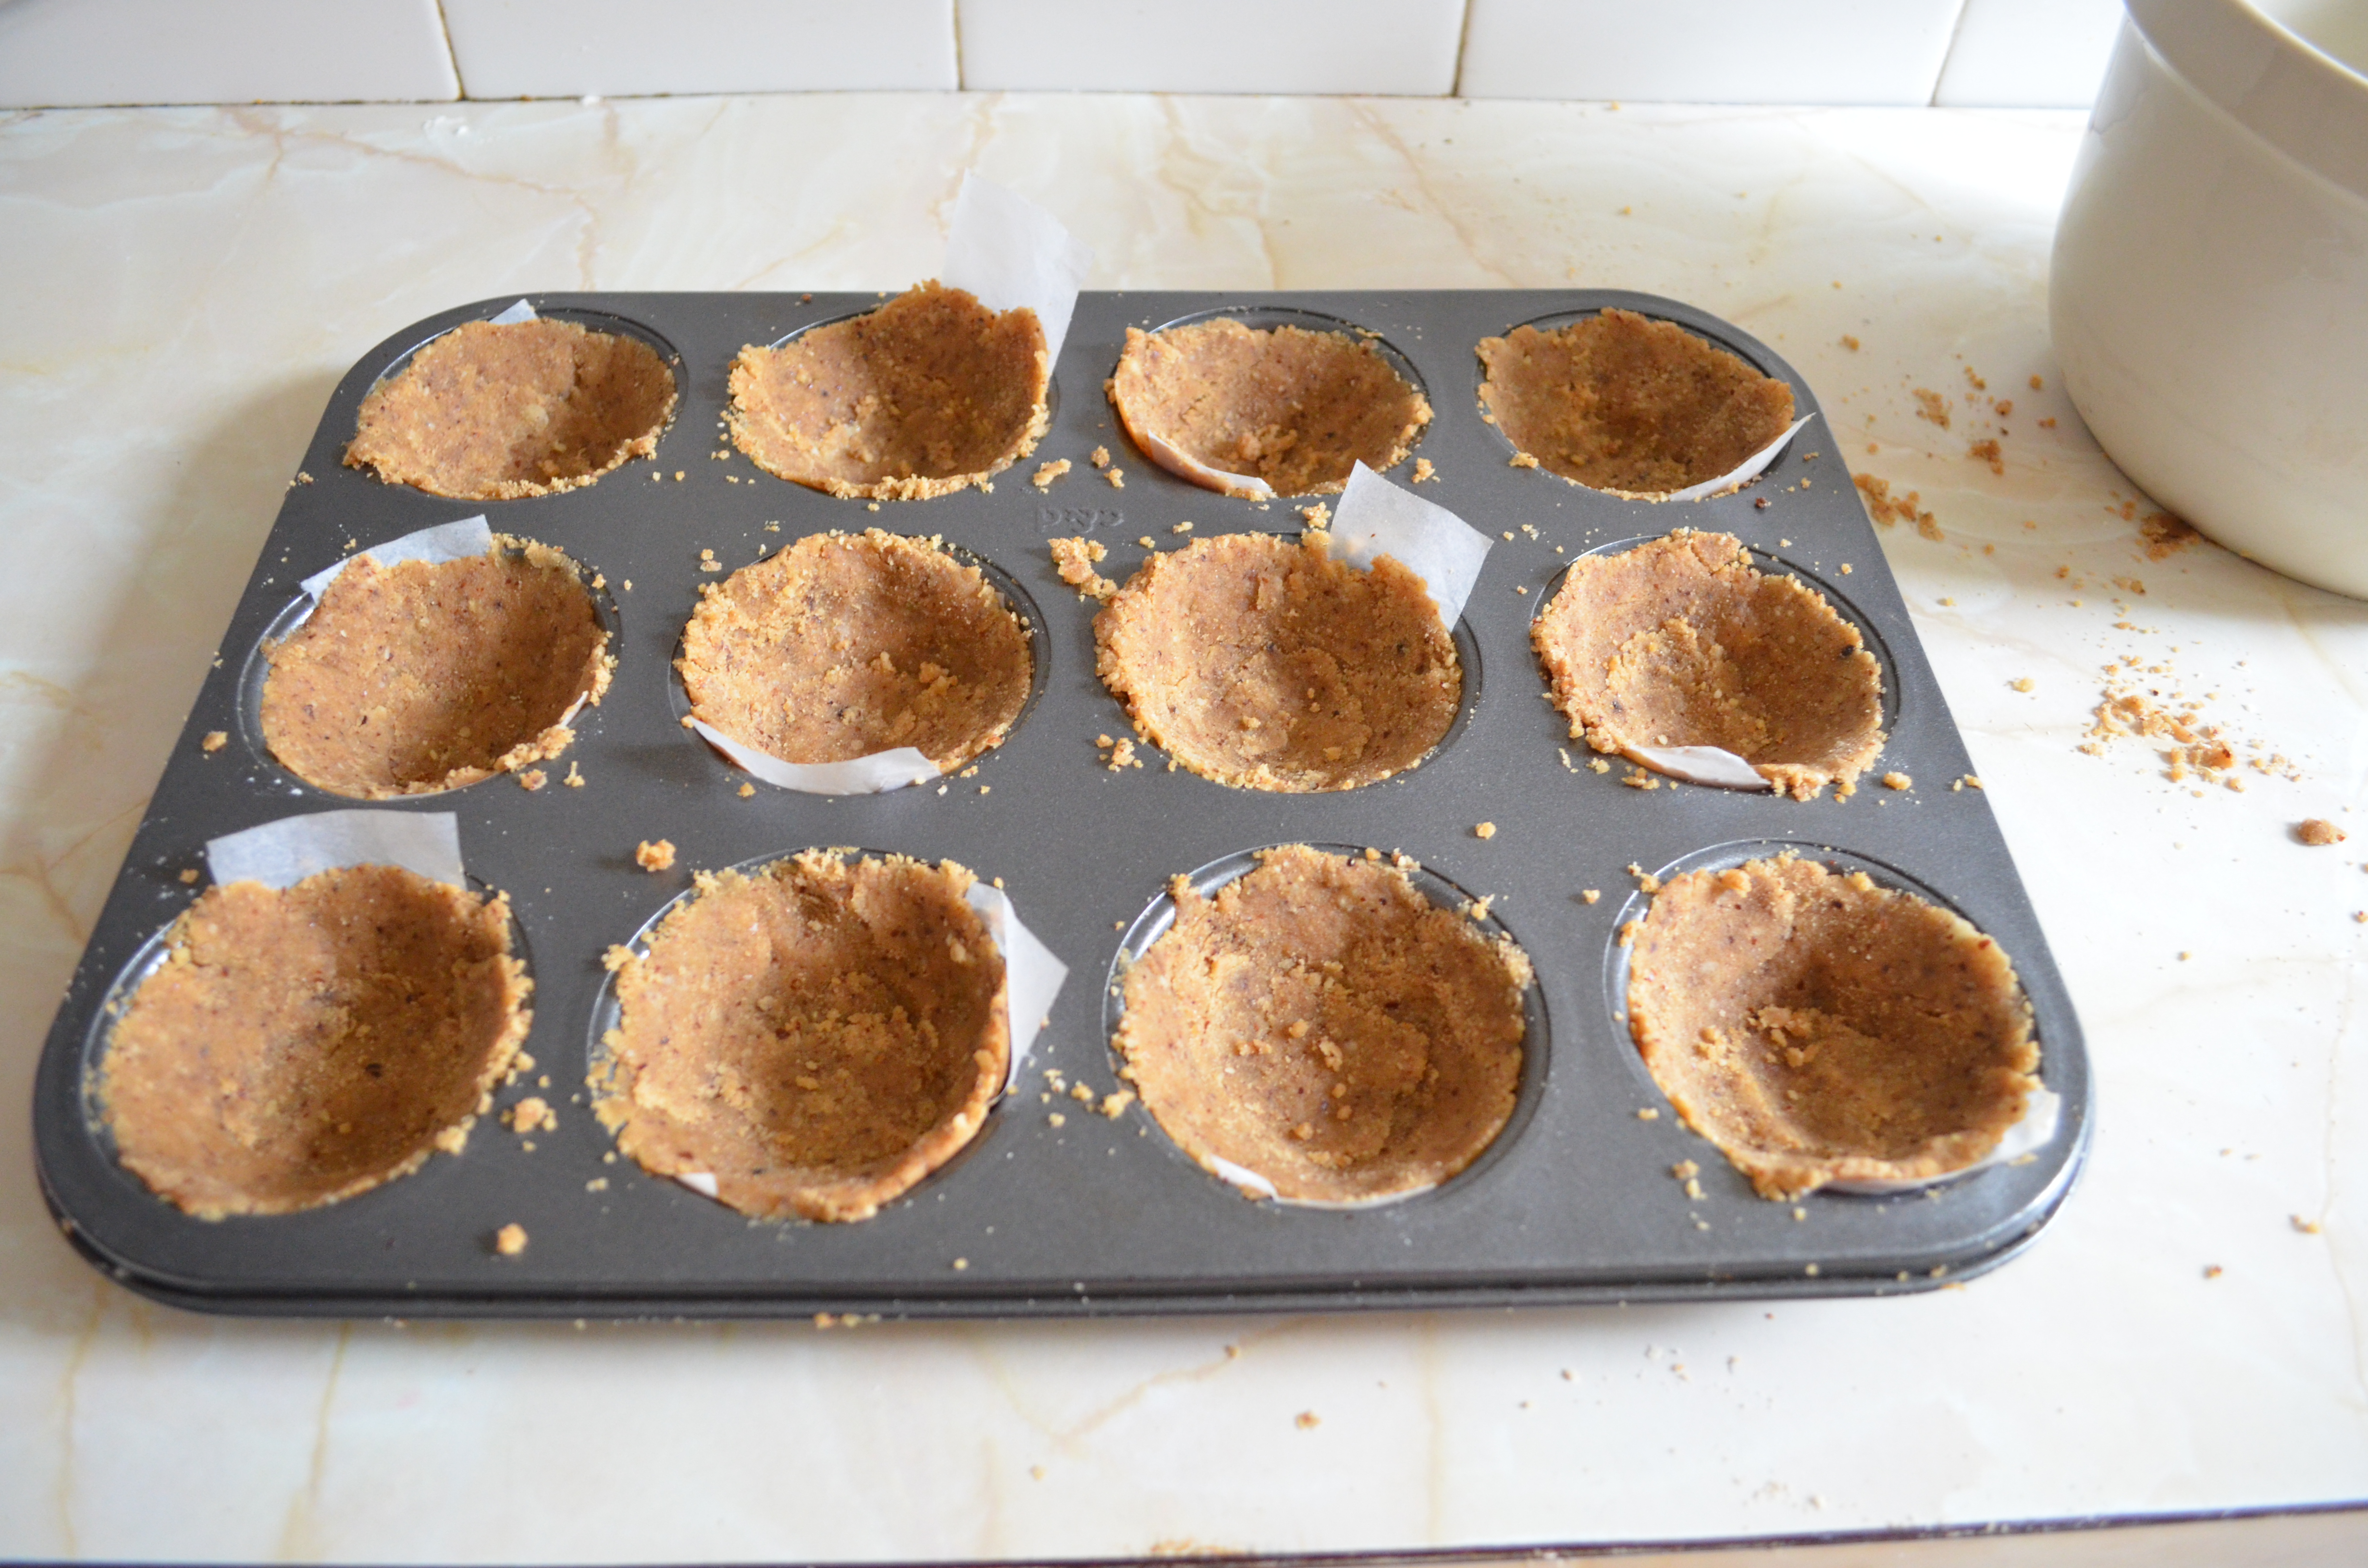
4. Bake for around 15 minutes or until nicely browned. They should have puffed up a little bit in the centre at this point, and I use the back of a rounded measuring spoon to gently press the sides of the still-hot cases and make a nice rounded bowl for the chocolate filling to come. Let cool completely before filling.

DSC_0292

5. I made the candied pecans while my tart cases were cooling. If you would like some to top your tarts (or just to eat on their own), simply stir the sugar, water and vanilla in a small saucepan over medium-high heat until the sugar is dissolved.

Add the nuts and stir until the mixture starts to turn golden and bubble, keep stirring for a couple of minutes to make sure they are all well coated and then carefully turn out onto a piece of baking paper to cool.

DSC_0296

6. Add chocolate, cream, vanilla and Baileys to a medium mixing bowl and stir over a pot of simmering water, making sure the base of the bowl is not touching the surface. Stir until the chocolate is completely melted and the mixture is smooth and well combined.

7. Pour mixture into cups until full, I created some cool marbling on a couple of the tarts by using a little measuring cup with a pouring lip with a little bit of cream coating the sides. Will definitely do it to all of them next time, test out my rusty barista skills.

8. Place tarts in the fridge until set and top with candied pecans to serve. So good!

DSC_0312

Some becma bakes fans:

DSC_0302
Jackie couldn’t wait to dig in…
DSC_0299
Two thumbs up from noted food critic Keira.

Salted Caramel Slice!

DSC_0241

You might have already noticed my fondness for salted caramel goodies.

It began in 2011 at an amazing chocolate shop in Camden Passage, London called Paul A. Young Fine Chocolates. Their sea salted caramel was a revelation and I have been a devotee ever since.

That devotion means salted caramel appears in my kitchen on a pretty regular basis; this incarnation is a twist on a well loved classic and is definitely one of my favourites.

I love it so much that I usually give most of it away so I don’t indulge too much!

You will need:

Base

  • 1/2 cup plain flour
  • 1/2 cup self raising flour
  • 1 cup tightly packed light brown sugar
  • 1 cup dessicated coconut
  • 120g butter, melted

Salted Caramel filling 

  • 1 tin sweetened condensed milk
  • 30g butter
  • 2 tbsp golden syrup
  • about 2 tsp sea salt flakes

DSC_0212Chocolate 

  • 180g dark eating chocolate (I used Cadbury Old Gold)
  • 2 teaspoons vegetable oil

Method 

1. Preheat oven to 180C and grease and line a 20x30cm slice tin.

2. Stir the sifted flours, coconut, sugar and butter in a bowl until combined.

3. Press base mixture into prepared tin and place in the oven for 15 minutes or until slightly browned.DSC_0203

4. Meanwhile, heat condensed milk, golden syrup, 30g butter and 1tsp salt flakes in a small saucepan over medium heat. Stir continuously for about 15 minutes or until golden. Let cool for 2 minutes and then carefully taste the still hot mixture, adding the rest of the salt if desired.

5. Spread salted caramel over base, sprinkling with more sea salt flakes if desired, and return to oven for 10 minutes.

DSC_0226

6. Remove slice from oven and cool.

7. Stir chocolate pieces and oil in a small saucepan over low heat until melted, then pour over cooled slice, smoothing with a spoon if necessary.

DSC_0230

8. Refrigerate slice for 3 hours or chocolate has hardened.

9. Cut into around 30 pieces with a hot knife.

I sometimes top the slice with additional salt flakes, like Himalayan pink salt, to finish the look. I didn’t this time because I had added salt between the chocolate and caramel layers, and because it wouldn’t have stayed on top for the journey in for morning tea at work.

DSC_0255

This recipe yields a nice big batch that will have you firmly in the good books with friends and family. Plus, the satisfaction of eating something this mindbogglingly delicious is always amplified when you’ve made it yourself.

Have a great week and happy baking!

Passionfruit Melting Moments

passionnnnnI’m a sucker for a good biscuit.

The passionfruit vine on our fence is going crazy at the moment (it isn’t even planted in our backyard, thank you neighbours!), so I’ve been incorporating the flavour into lots of my baking.

The tangy passionfruit flavour goes really nicely with the crumbly, buttery biscuits. Perfect with a cup of tea or as a late night treat.

I made the biscuits purple to evoke the contrast of the passionfruit shell with the yellow pulp. I probably didn’t achieve the perfect colour but I still think they look pretty. So, food colouring  is totally optional here.

You will need:

Biscuits

  • 250g unsalted butter, softened
  • 1 tsp vanilla extract
  • red and blue food colouring, if desired
  • pinch of sea salt flakes
  • 1/2 cup icing sugar, sifted
  • 1 1/2 cups plain flour, sifted
  • 1/2 cornflour, sifted

DSC_0177

Passionfruit butter cream

  • 90g unsalted butter
  • 3/4 cup icing sugar, sifted
  • 1 tbsp passionfruit juice, seeds removed

Method

1. Preheat oven to 160ºC and line two oven trays with baking paper.

2. Beat butter, vanilla, salt and icing sugar with an electric mixer until light and fluffy. Add food colouring if desired, and stir to achieve a light purple mixture.

DSC_0164
I love my Kenwood Chef!

3. Add flours in two batches, stirring between additons.

4. Using lightly floured hands, roll generous teaspoons of mixture into balls and place on prepared trays, leaving 2cm spaces between each of the biscuits. Flatten slightly with a lightly floured fork.

DSC_0175

5. Bake for about 15-20 minutes and stand on trays to cool.

6. Meanwhile, make the butter cream. Beat butter and icing sugar (does anyone else hate sifting opened icing sugar as much as I do!?) until light and fluffy. Stir in passionfruit juice until combined.

DSC_0178

7. Sandwich biscuits with about a teaspoon of the butter cream. Mmm mm!

Makes about 20 filled biscuits.

DSC_0191

Little Lemon Cheesecakes

I love these little cold set cheesecakes for their ease and light but indulgent taste. They are simple to make and look great set out at a party or dinner- plus, you won’t need to fire up the oven.

I was first inspired to make them as a canvas for the gorgeous salade de fleurs I found at The Essential Ingredient, and have varied the topping to include fresh violets, candied flowers and lemon rind.They look lovely with berries, too- basically you want to pair them with something colourful and tasty!

My most recent batch were for New Years Eve, and I was rushing to leave (typical Becma) so I didn’t get a chance to get any photos of the process, but it’s fairly simply to follow.

Ingredients 

Base 

  • 200g digestive biscuits
  • 100g unsalted butter, melted.
  • 1 tbsp lemon rind, finely grated

Filling

  • 300ml single cream
  • Philadelphia cream cheese
  • 250g icing sugar, sifted
  • Juice of 1 lemon
  • 1 tbsp lemon rind, finely grated

Decoration 

I suggest: Salade de fleurs, fresh violets, candied flowers, lemon rind and fresh berries.

Method 

1. Line a 12 hole muffin tray using squares of baking paper (or paper cupcake cases, if you’re in a hurry).

2. Break up the biscuits using a rolling pin or food processor until you have mostly fine crumbs (I like a few bigger bits for texture). Add the butter and rind and stir or process until well combined.

3. Place about 2 tablespoons of base mixture into each of the lined spots and press down. You want nice thick bases for your cheesecakes, so use a bit more mixture if you have leftovers, just make sure you don’t go above the halfway point. Place in the freezer for 30 minutes or until firm.

4. Beat the cream in a large bowl with an electric mixer until it nearly holds its shape but not quite, then beat in softened cream cheese until smooth.

5. Add juice and rind and begin beating on a medium speed, gradually adding icing sugar until the mixture is smooth and mostly free of lumps.

6. Spoon mixture on top of the prepared bases (still in tray) and place in the freezer for at least two hours. Remove baking paper from frozen cheesecakes and move to fridge shortly before serving. Decorate with whatever you have chosen and serve with berries, if desired.

Yum!

DSC_0114